Monday, March 7, 2011

Paisley Lone Star

On Jan. 15, I posted a picture of some fabric I bought at The Quilted Fox in St. Louis for my guild’s winter challenge. I had to use the paisley fabric provided by the challenge, plus I added 3 more paisley prints and some blues, greens and yellows for a Paisley Lone Star. I worked on this quilt while I was taking care of my daughter in Tennessee and off and on during her most recent hospitalization. Even so, I was under pressure to finish it in time for the guild meeting Thursday night.


The challenge fabric is in the center. I only had two fat quarters—not enough to make all eight pieces match because the print had a big repeat. So I alternated a paisley and a feather. I sewed this center FIVE times before I got the seams to line up. Each time I ripped, I knew that the pieces were getting even more distorted. I kept thinking, What’s wrong with me? Why can’t I get this right? But then I remembered that these center pieces were all fussy-cut, and not one of them was on the grain. I gave myself a break and managed to wrangle them in there.


Here is a detail from the setting squares. I decided to machine applique some paisley shapes, and added a flower and leaves. Those “ribbons” are ¼” strips. The dark green strip was cut straight and the yellow and white strips are curved. Overall, it gives the effect of a wreath of ribbons around the star. I tried a new product to make these applique shapes—Heat ‘n’ Bond Lite. It worked very well—really flexible.


I auditioned fabrics for the border and decided on this blue and green paisley, a fabric so beautiful that I just wanted to leave it alone and look at it. But something still seemed to be missing, so I decided to add a ¼” strip of dark green around the star. That really set it off. I had to make another trip to The Quilted Fox to get enough fabric to finish the border, but I was in St. Louis anyway when my daughter was in the hospital. Here is the finished quilt (50” x 50”):


The effort was worth it, because my Paisley Lone Star won first place in the challenge! It was a very good quilting week for Feltsey! The challenge quilts will be on display at the Rolla Public Library in March and at Uniquely Yours, a local quilt shop, in April.

Thanks to Jan P. Krentz, author of Lone Star Quilts & Beyond. I took a terrific class from Jan last fall in Des Moines. I highly recommend her book if you want to make a Lone Star. Her website is http://www.jankrentz.com/.

Tuesday, March 1, 2011

I made the magazine!

Here is my version of the mystery quilt project from American Quilter magazine--Danica's Pink Butterfly Quilt.

I received a phone call today from Chris Brown, editor of American Quilter, who said that this quilt is one of three selected to appear in the May issue of the magazine. Hurray! I won 50 fat quarters from Moda Fabrics, $75 in books from AQS publishing, and a year's extension on my subscription to American Quilter. I forgot about the prizes, I was so focused on just getting into the magazine!

Go to: http://www.americanquilter.com/publications/readers_contests.php?id=1&year=2011 to see the pictures (taken by the quilters) of the 69 quilts finished in time to meet the deadline. These eight were chosen to be sent to Paducah to be photographed:

K. Adamo--Riptide
D. Alexander--Cat and Mouse
Amy Allen--Mystery
C. Felts--Danica's Pink Butterfly Quilt
A. Fuller--Maple Mystery
S. Hicks--A Taste of Minnesota
A. Means--Cameo
B. Schillig--Morning in Marblehead

Two others, besides mine, will appear in the May issue of the magazine. Hurray again! There are some beautiful quilts here, and it is interesting to see how each quilter used color and interpreted the directions.
Check them out.

Saturday, February 26, 2011

Folded bow tie block

To give credit where credit is due: This method of making a dimensional or “origami” bow tie—one with the knot as a folded piece in the center—was taught to the Piece and Plenty Quilt Guild in Rolla, Mo., by Julia Ming-Hsiu Hsu of Brother Sewing Machines in 1997. As Julia traveled around giving programs, she probably taught this little pattern to many people. I wrote down the directions so I wouldn’t forget them, and I’ve been making these bow ties ever since. This method is different from some of the others I have found on the Internet.


Cutting

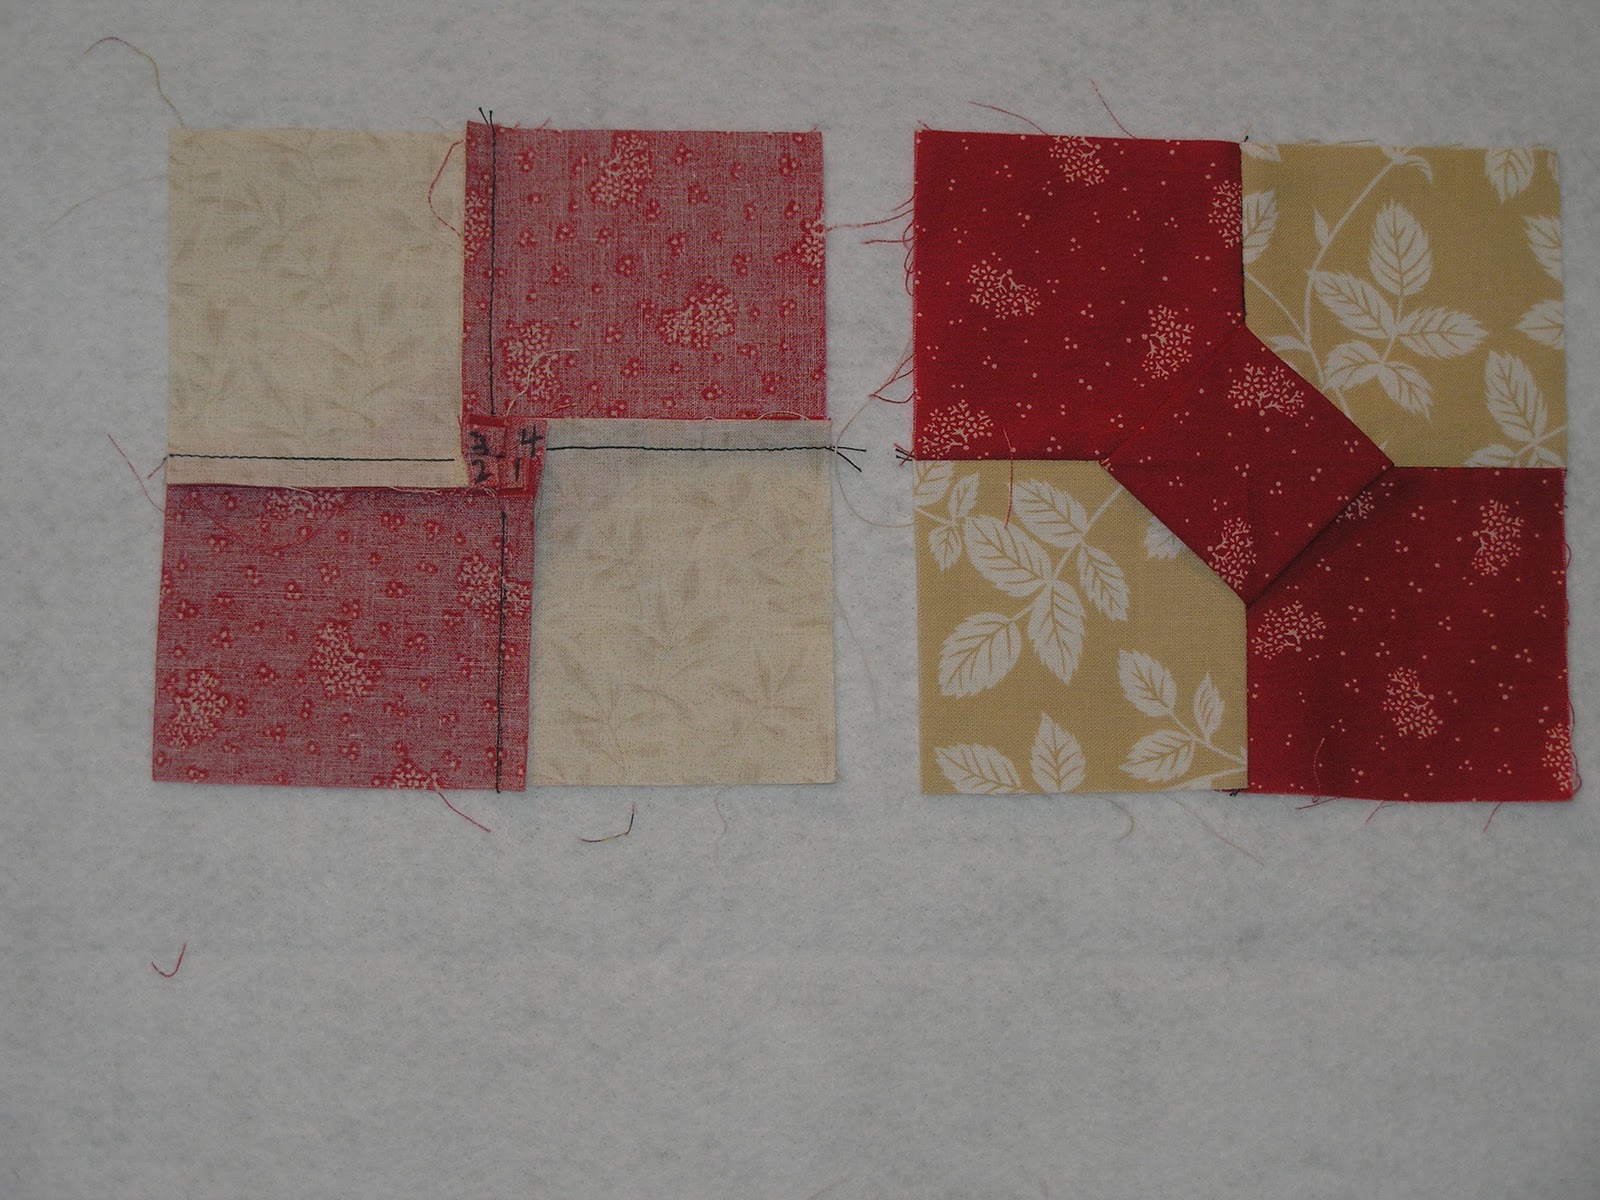
Cut 2 squares for the background and 3 squares for the bow tie, as in the picture above. Choose a size depending on the desired size of the finished bow tie. 2½” squares yield a 4” finished block, 3” squares finish to a 5” block, and 3½” squares finish to a 6” block. Contrast is important in this block; make the bow tie dark and the background light, or vice versa. Both light and dark bow ties can be used in the same quilt; it depends on how you want your quilt to look. More about that another day.

On the wrong side of one bow tie square, number the corners as shown above (the red square on the left), but don’t use a Sharpie, as I have done here so you can better see my photos. Imagine there are two fold lines in this square—one horizontal and one vertical. To help you imagine this, I have drawn them on the light-colored sample square on the right, but you would NOT draw in these lines. This numbered square is the center of your bow tie, the knot.

Step 1


Fold the center (knot) square in half along fold line 1, wrong sides together. Layer this folded piece on a right-side-up background square, shown above, top. Take a bow tie square and layer it on top, right sides together. I put in a couple of pins here, because the layers tend to shift and slide. Sew all layers together in a ¼” seam, stopping about ¾” from the top edge (above, center). The bottom sample in the photo above is what the bow tie looks like at this point.

Step 2


In the photo above, I have turned my block a quarter turn to the right, shown in the sample at the left. The center sample shows how to open up the center square and refold it along fold line 2 so that corner 2 meets corner 1, wrong sides together. Have the second background square ready to layer on top, right sides together. Sew it as before, stopping about ¾” from the top edge. Open up the bow tie. It should look like this:

Step 3

Bring corner 3 to meet corner 2, wrong sides together, folding again along fold line 1, shown above. Sew a bow tie square on top of the second background square, right sides together, stopping ¾” from the edge, as before. The picture below shows how the bow tie looks now (on the left) and after it is opened up (on the right).


Step 4


Now open the center square. It should look like the example above, on the left. Bring corner 4 to meet corner 3, wrong sides together, shown in the example on the right. Fold the background square down over the knot piece and sew the final seam, again stopping about ¾” from the center, shown in the photo below, on the left. Open up the finished bow tie. There will be a small hole in the center on the wrong side.


Pressing


From the wrong side, press all the seams in the same direction, shown above on the left. I press counter-clockwise because I am right-handed and iron from right to left. The seams in the middle will form a nice, neat, flat square with the little hole in the center. The finished pressed block is shown on the right.


If you are working with directional prints such as stripes and it matters to you that the pattern on each piece of the bow tie runs in the same direction, be careful how you place your squares. As you practice, you will be able to stop your stitching about 1/2" from the center instead of 3/4" and this will make the center hole smaller--not that it matters much. You will also be able to make these production-line style. I make 6 to 8 at a time, all step 1, then step 2, etc. I have 109 now. I plan to make a bed-size quilt, something I haven’t done in a long time, and quilt it in sections.


Next--different arrangements of the bow tie blocks.

Friday, February 25, 2011

Health issues

I’m back at blogging after a month of helping my daughter Genevieve deal with her harrowing health problems. Yes, she got out of the hospital in late January after her bowel surgery and post-op infection, and I took her home to Tennessee—one day before “Snowmageddon” struck central Missouri on Feb. 1. (The snow is all melted now, and daffodils are coming up!) But she didn’t stay out of the hospital. First she had a 36-hour hospitalization in Tennessee for IV fluids. Then on Feb. 10, she had an episode of severe pain and knew it was a bowel obstruction. Sadly, she has felt that kind of pain before. So it was back to “The Big House” in St. Louis for her second major surgery in 6 weeks. This time the bowel obstruction was caused by adhesions. It has been two weeks since that surgery, and she is still in the hospital, just now starting to eat solid food. My husband and I are wearing out the highway from our house to The Big House, making her walk the hospital corridors, and encouraging her to eat.

During the time I was at Genevieve’s house in Tennessee, I managed to get some sewing done. One of the things Vieve worried about was the Valentine’s Day party at Danica’s preschool—she wanted to give something nice to the teachers. Being a great grandmother and a pretty good quilter, I not only helped Danica sign her name to every Valentine, I made little quilts for the teachers. It was something small I could do for my daughter.

I have had bow ties on my brain ever since last summer, when I saw my friend Barb’s cute, cute bow tie quilt, so that’s what I decided to make for the teachers. I know an “origami” or folded method of making the bow ties—the knot of the tie is a folded piece in the center. I have looked for the directions on the Internet, searching for “folded bow tie” and “origami bow tie,” and I found many links. However, none of them match the way I make the block, so I will get it together in the next couple of days, take some pictures, and show you how to do it.

For the teacher gifts, instead of making the knots match the ties, like this:


I decided to mix it up a little, and move the knots around, like this:


I am not sure whether I like the mixed-up knots as well as I like the bow ties where everything matches. I decided that the mix-up is OK in these little quilts—the blocks still look like bow ties. (These are just 4-inch blocks. I started with 2 1/2-inch squares.) But in a larger quilt, the whole thing might be confusing—a jumble of squares—and the bow tie image might be lost. Anyway, these two cute 14-inch quilts were my way of saying thank you to the teachers for supporting Danica and Genevieve this year. When the going gets tough, the tough quilt, right?

Genevieve and Danica on Monday at the hospital:


Coming up—my method for making a folded bow tie block.

Thursday, January 27, 2011

Good news

Good news--my mystery quilt, Danica's Pink Butterfly Quilt, was chosen to be photographed by American Quilter magazine! Hurray! Only three of the mystery quilts will appear in the magazine, but this means that at least a photo of my quilt will be on their website. I'll send my quilt to Paducah in the next week. I posted several in-progress photos previously, but I won't post a finished photo here because I want you to see it in the magazine.

I learned a lot about photographing quilts from this experience. It's hard to get the colors correct, and photographs can really highlight all the flaws in your quilt. I put so much machine quilting into this one that I had a hard time getting the edges even. Eventually, I ripped off the binding and even ripped out quilting and remade a section. I also suffered from a broken sewing machine and the effects of being in a hurry. Since my daughter was in the hospital with a bowel obstruction right after Christmas--and is back in now with an infection--I had to fit the quilting of this piece in between trips to the hospital and taking care of my granddaughter. Not a good combination. I ripped out more of this quilt than anything I have ever made.

Well, it's over now, unless I decide in the next day or two to rip the binding off one side--again--to TRY to fix a little ripple. I'm off to "The Big House," as Genevieve calls it--Barnes Hospital in St. Louis--to see if they will release her today. She's been in for a full week this time. Poor thing--nothing like spending almost a month in the hospital. But she's pumped full of antibiotics and is better, so I just might stop in at The Quilted Fox store to show them a finished quilt with some of their fabric in it.

Wednesday, January 19, 2011

Laugh with me!

Isn’t this always the way things go: when you’re in a hurry, s**t happens. My first mishap while quilting my Mystery Quilt can be seen below.


What the heck IS that? A scrap of fabric stuck to the quilt, and I quilted it right into the back! How did I miss that? I was intent on getting the quilting right, I guess, and in a hurry, of course. No way am I ripping out all that free-motion quilting to get out this scrap. I found if I trim the scrap very close to the quilting stitches, it pulls right out. But there is a lot of trimming and pulling of threads to do. You just have to laugh at this one. And be glad it’s not you.

My Mystery Quilt is heavily quilted, and I was careful to clean my machine as I went along. Look at this fuzz build-up:


A bird could build a nest out of that lint! I used Dream Orient batting, a combination of silk, bamboo, Tencel and cotton, for the first time. It is thin and very soft and quilted beautifully. However, it was more expensive, and I probably could just as easily have used Dream Cotton. For this project, I didn’t need the “elegant silky soft drape” described on the package. I don’t think it produced more lint than a cotton batt would have. The fuzz was just a product of the amount of quilting I did.

In the end, my effort to keep my machine in tip-top shape failed. Mishap #2: My Bernina 1230 broke anyway just as I was about to attach the binding. The motor runs, but the needle doesn’t move up and down. My really old back-up Bernina went off to Colorado with my daughter after Christmas, so I had to sew the binding on with a Singer Featherweight. Thank goodness I had one:


So I drove about 90 miles today to Top Stitch Sewing Service, where my quilting buddies buy their machines and take them for repairs. (Along the way, I saw a magnificent bald eagle, ripping the guts out of a carcass in a field right near the road. I mention this just so you get the idea that I was nowhere near a city.) Top Stitch is on State Route C east of Versailles and north of Barnett, and I thought I might have trouble finding a little sewing shop way out in farm country. The shop really is surrounded by fields, but I couldn’t miss the 4-foot-high red BERNINA letters on the building, and it was the biggest sewing machine store I’ve ever been in! They don’t sell fabric—only machines, cabinets and thread.

The shop owner, Tim, said, “We can fix anything,” so there probably will be no need for me to buy a new machine, but I checked out the Bernina 830 while I was there, since I drove so far. (Impressive but pricey, even with the good deal Tim quoted me.) The shop will do a rush job for me, and my 1230 should be ready on Friday. But guess what? A snowstorm is coming. Back to get my machine on 90 miles of typical Missouri Ozark roads? You gotta laugh with me on this one….

Saturday, January 15, 2011

Sewing addiction

I was in my daughter’s hospital room on Wednesday when her surgeon came in for rounds. As he stood there and talked, I noticed a long string of thread hanging down from one of his buttonholes. It was hard but I kept my mouth shut. (How embarrassing would that be—“Hey, doc, your buttonhole is fraying, let me get that for you….”) I did, of course, have sewing scissors with me, along with quilting thread and a miniature quilt in my purse. So I could have fixed it for him. But what does this say about me?!! I have a serious sewing addiction, that’s what!


I worked as an English teacher for 9 years, and I always struggled to find time to sew. Every second spent grading those papers was time away from my sewing machine. When I wasn’t sewing, I was thinking about what I wanted to be sewing and how pretty it would be. Now I finally have time to sew and I still constantly think of my next project. When I was in St. Louis on Wednesday, I stopped at The Quilted Fox, my favorite quilt shop, to buy some needles and look at fabric. See http://www.quiltedfox.com/ I suspected there would be something nice there.

So in my purse was a piece of paisley fabric from my quilt guild’s yearly challenge:


The rules this year are simple—just use the paisley fabric and make the quilt crib size or smaller. I considered challenging myself to use only fabrics from my stash for this project, but when I walked into The Quilted Fox, I threw that idea out the window. Here is what I came home with:


I don’t yet know what this paisley challenge quilt will look like. I have no particular pattern in mind, but I have multiple ideas, and I sure will have so much fun figuring out how to put these fabrics together!

I have no papers to grade anymore, so finally, finally, I can not only THINK about sewing, I actually get to sew. This week I have been quilting my American Quilter magazine Mystery Quilt, trying to finish it by the deadline.


When I begin a machine quilting project, I always get a sinking feeling brought on by thoughts of “Here is my beautiful quilt top, and I’m going to ruin it—my quilting won’t be good enough—I can’t do it justice—this is too difficult with my regular sewing machine, etc., etc.” Doubts, doubts, doubts. Then I dig in and tackle the project. Eventually I settle down and realize, all over again, that my machine quilting is not too bad, this quilt really will fit under the sewing machine arm, and I’m not ruining the top at all, but adding another layer of interest. It has been slow going, but I’m very much enjoying the quilting this time.


Today my daughter is getting out of “the big house,” as she now calls Barnes Hospital, and coming to my house for a couple of days before she goes home. It will be a pleasure to fix her whatever she feels like eating. It’s no small thing to eat normally again after a bowel obstruction. But as always, every minute, sewing addict that I am, I’ll be yearning to get back into that studio and sew.